Phillip Trelford's Array

POKE 36879,255

Silverlight Context Menu Scrolling

Does your application have long context menus that get clipped inside small windows?

First ask yourself is this the right user interface.

If so then one solution is to add a vertical scroll bar automagically to the context menu.

IntelliSense in Visual Studio uses a maximum size constant for the context menu to cope with the inordinate number of members on many classes (over 150 members on a Button):
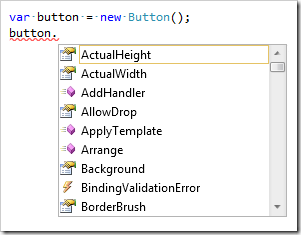
button_intellisense

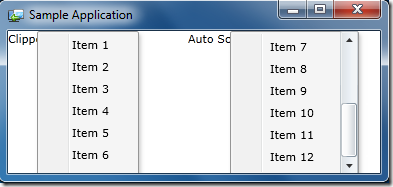
Another option, when screen space is at a premium and windows are small, is to peg the maximum size of the context menu to the window height:
ContextMenu

The screen shot above shows a Silverlight out-of-browser window where the left context menu is clipped, the right simply employs a scroll bar to make all menu items accessible.

Clipping is the default behaviour in the Silverlight Toolkit’s ContextMenu control. In the Silverlight Multi-Window Controls project I’ve made automatic scrolling the default.

Adding Scrolling to the Silverlight Toolkit ContextMenu

The first step is to add a ScrollViewer control to the Silverlight Toolkit’s ContextMenu style which coincidentally already contains one that only needs be un-commented:

    <!--<ScrollViewer
        Margin="1,0,1,0"
        Grid.ColumnSpan="2"
        BorderThickness="0"
        VerticalScrollBarVisibility="Auto">—>
            <ItemsPresenter Margin="{TemplateBinding Padding}"/>
    <!--</ScrollViewer>-->

To set a constant maximum height, simply add a MaxHeight property value.

Pegging the maximum height of the context menu to the window’s height is a little more involved. The mechanism I came up with was to make the ScrollViewer’s parent control (a Grid) track the height of the window:

    <controls:ResizingGrid>
        <ScrollViewer
            Margin="1,0,1,0"
            Grid.ColumnSpan="2"
            BorderThickness="0"
            VerticalScrollBarVisibility="Auto">
            <ItemsPresenter Margin="{TemplateBinding Padding}" />
        </ScrollViewer>
    </controls:ResizingGrid>

The tracking is implemented in a ResizingGrid class that inherits from Grid:

public class ResizingGrid : Grid
{
    FrameworkElement _rootVisual;

    public ResizingGrid()
        : base()
    {
        this.Loaded += GridLoaded;
        this.Unloaded += GridUnloaded;
    }

    void GridLoaded(object sender, RoutedEventArgs e)
    {
        if (Application.Current.IsRunningOutOfBrowser &&
            Application.Current.HasElevatedPermissions)
        {
            var window = Window.GetWindow(sender as DependencyObject);
            _rootVisual = window.Content;
        }
        else
        {
            _rootVisual = Application.Current.RootVisual as FrameworkElement;
        }
        _rootVisual.SizeChanged += ContentSizeChanged;
        SetHeight(_rootVisual.ActualHeight);
    }

    void GridUnloaded(object sender, RoutedEventArgs e)
    {
        _rootVisual.SizeChanged -= ContentSizeChanged;
    }

    void ContentSizeChanged(object sender, SizeChangedEventArgs e)
    {
        SetHeight(e.NewSize.Height);
    }

    private void SetHeight(double windowHeight)
    {
        var size = this.MeasureOverride(
                          new Size(double.MaxValue,double.MaxValue));
        var contentHeight = size.Height;
        Height =
            windowHeight < contentHeight
            ? windowHeight
            : Double.NaN;
    }
}

Adding Scrolling to Telerik’s Silverlight RadContextMenu

Telerik have a “How To” page on adding a ScrollViewer with a MaxHeight to their context menu control: Add Scrolling to RadContextMenu.

It requires Expression Blend, which is currently available free in preview form:

There is very little difference between the Silverlight Toolkit and Telerik context menu implementations, so the style can be adapted for automatic resizing in the same way as the Silverlight Toolkit context menu was by using the ResizingGrid:

    <this:ResizingGrid>
        <ScrollViewer VerticalScrollBarVisibility="Auto">
        <ItemsPresenter Margin="1"/>
        </ScrollViewer>
    </this:ResizingGrid>

That’s it! Happy right-clicking.

Silverlight 5: Multiple Windows

Silverlight has become increasingly popular for applications that run both in-browser and on the desktop like Sky’s Go and Netflix. One of the key new features in Silverlight 5 is multiple window support for desktop applications (also known as Out-of-Browser (OOB) applications).

Why Multiple Windows?

Multiple windows are common in quite a few applications:

  • graphics packages like GIMP
  • video production software like Adobe Premiere
  • music editing software like CakeWalk
  • e-mail packages like Outlook
  • the long tail of Line-of-Business (LOB)/Enterprise/Scientific applications

Multi-window apps let users optimize usage of screen real estate across multiple displays.

    Why Silverlight?

There are a number of scenarios where you might choose Silverlight over say WPF:

  • you have an existing application written in Silverlight
  • your application needs to run both in-browser and on the desktop
  • installing the full .Net framework in your target environment is problematic

On the flip side, if you're developing a new application that must support multiple windows and that doesn’t need to run in the browser and you have full control over the target environment, then WPF is probably a good choice. WPF also provides better support for dragging and dropping between windows. Yet another choice might be to build your application to target both WPF and Silverlight.

WinRT

Then to add some more factors to the equation, there’s the new Windows Runtime – WinRT:

winrt

From the diagram above you can see that WinRT will only run on Windows 8 which isn’t even released yet, and WinRT is not intended for desktop applications. It is also possible to create desktop applications for Windows using HTML and JavaScript, check out Cut the Rope. Practically though if you’re building an application that can run on the desktop using managed code the choice is still between WPF and Silverlight.

Getting Started

There are a good number of articles already written on getting started with multiple windows in Silverlight. Simply pick your favourite evangelist:

Cutting to the chase:

new Window().Show();

RootVisual

Nearly a year ago Mike Taulty wrote:

As an aside, I’ve seen a number of scenarios in Silverlight where developers use Application.Current.RootVisual as a way of finding the root of the visual tree – this kind of code might need revisiting in a Silverlight application that has content in multiple windows because the RootVisual does not necessarily provide a “root” for content living in a separate window.

Q: So how do you find the RootVisual in a multi-window environment?

A: Call Window.GetWindow and then look at the Window.Content.

Focus

Q: How do you find the focused element in a multi-window environment?

A: Call FocusManager.GetFocusedElement with the answer from Window.GetWindow.

Popups

Q: How do I get Popups to appear in a secondary window?

A: Popups defined in a XAML view appear inside their parent control. If you are creating a Popup programmatically then you will need to call Popup.SetWindow.

Issues

Q: So far calling Window.GetWindow solves all, where are those inevitable niggling issues?

A: All over the shop:

  • A lot of third party software (including Microsoft’s) is going to still assume there can be only one window via Application.Current.RootVisual.
  • If your doing custom chrome (no borders) then maximize on secondary displays is broken.
  • Don’t even think about trying to set the WindowStyle to BorderlessRoundCornersWindow if it isn’t the main window.
  • Move controls between windows at your own risk. Certain controls like Tooltips currently cache the window they first appeared in. Moving controls that use tooltips to another window may prove fatal.
  • Tooltips again, they are positioned based on the main window size rather than the window they are actually in.

Silverlight Toolkit

Both the ChildWindow and ContextMenu controls fail in a multi-window environment

I’ve created an open source project on CodePlex where they can succeed:

Telerik

At time of writing Telerik’s RadContextMenu, RadWindow & RadComboBox do not work in a multi-window environment.

Some of the issues are expected to be fixed in a mid-February release.

Summary

It’s clearly early days for Silverlight 5 multi-window support and it looks like third party vendors are still playing catch-up. That said, with the advent of SiIlverlight 5, and it’s support for multiple windows, the lines between desktop and browser application are blurred a little bit more.

Silverlight 5’s ChildWindow in Multiple Windows

A ChildWindow in Silverlight is a control that can be displayed over a parent window blocking its interaction. Silverlight 5 introduces multiple window support for Out-of-Browser (OOB) applications with elevated trust. Unfortunately the ChildWindow control is not currently multi-window aware which means, as is, a child window may only appear in the main window.

Finding the code

With the release of Silverlight 5 the ChildWindow control is part of the main distribution, where previously in Silverlight 4 it was bundled with the Silverlight Toolkit. Therefore to change the code to make the control multi-window aware we’ll have to resort to the Silverlight 4 Toolkit source, conveniently available on CodePlex.

Examining the code

The ChildWindow class makes 2 assumptions that prove false for multi-window apps:

a) the parent control will always be the current application’s RootVisual, e.g.

private static Control RootVisual
{
    get { return Application.Current.RootVisual as Control; }
}

b) the size of the parent window is based on the application’s host window Content, e.g.

Application.Current.Host.Content.Resized += new EventHandler(Page_Resized);

Fixing the code

In terms of code changes, the main one is to allow the parent window of the ChildWindow to be specified using a SetWindow method (as implemented by the Silverlight 5 Popup control). Then to simply replace all references to content made via static properties of the Application class with references to content via the specified window.

To use the updated control we will also need to create a new Silverlight 5 project to host it in and copy the related files over from the Controls project of the Silverlight.Controls.Sdk solution, including the ChildControl’s style from the project’s generic.xaml.

Get it now

The source is available on CodePlex: Silverlight Multi-Window Controls